Are you tired of dealing with a leaky or outdated shower faucet? It’s time to upgrade! Switching out your shower faucet handle is an effective way to improve your shower’s appearance and functionality. A replacement can even save you money on your water bill if your current one leaks.
Learn how to replace shower faucets of all kinds using our helpful tips, or hire us for shower faucet replacement services:
- How to Replace a Shower Faucet: Single Handle and Double Handle Models
- How to Replace a Shower Faucet FAQs
How to Replace a Shower Faucet: Single Handle and Double Handle Models
Before starting your shower faucet replacement project, determine whether you have a double- or single-handle faucet. Single-handle faucets use one handle to control both temperature and water flow. Double-handle models use one handle to control the flow of hot water and another to control cold water.
Make sure that the faucet you want to install matches your existing model. If it doesn’t, you’ll need a professional plumber to add or remove pipes.
Thankfully, both single- and double-handle faucets have similar replacement processes. The only significant difference is that the handle installation is performed twice on double-handle models.
Here’s how to replace a shower faucet:
- Identify the faucet type: Before turning off the water and removing old fixtures, determine if your faucet is a ball, cartridge, or disk type. You can do this by looking up the faucet model. Markings indicating the manufacturer and model can usually be found on the handle or the plate near the handle. If there are no visible markings, you will need to disassemble the faucet.
It’s important to identify the faucet type before buying your replacement. The hardware for your new unit needs to match the old unit’s hardware. - Gather tools and supplies: After identifying your faucet type, gather your tools. You’ll need an adjustable wrench, pliers, gloves, towels, a screwdriver, and plumber’s tape.
- Shut off the water: Locate the water shut-off valve for the shower and turn it off. Turn on the shower to release any water still in the pipes, then turn the shower off after it stops dripping.
- Remove the old shower head (optional): You only need to do this step if you are replacing the shower head along with the faucet. To remove the old showerhead, turn the connecting nut at the pipe end of the showerhead attachment counterclockwise using a wrench or pliers. Place a towel over the nut before turning it to avoid scratching the paint.
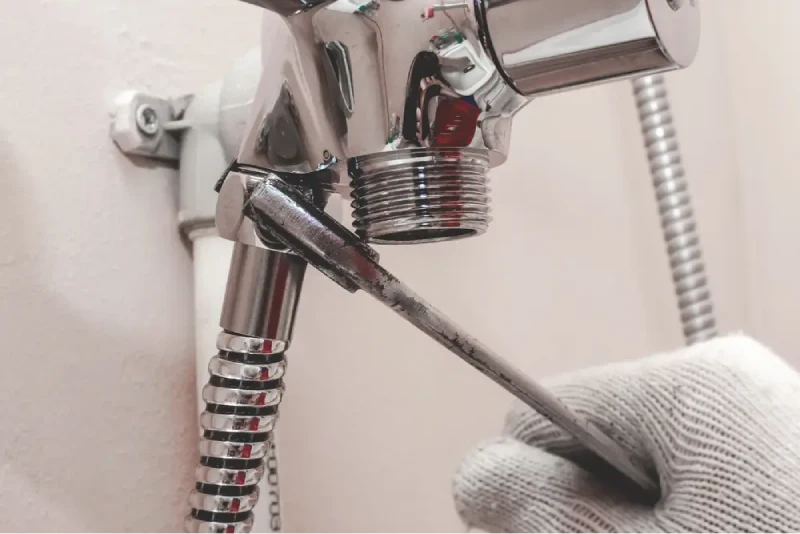
- Remove the faucet handle(s): If your faucet handles have a cover plate, pry it off with a small screwdriver. If the handle has a set screw, use the appropriate screwdriver or Allen wrench to remove the screw. After removing the screw, pull the handle free. Now that the handle is out of the way, use a screwdriver to remove the screws holding the old trim kit to the wall.
- Install your replacement faucet handle: With the old faucet handles removed, you can finally install your new ones. Follow the manufacturer’s instructions that came with your hardware to set up the new trim kit. Once the trim kit is installed, slot the handle onto the wall pipe and screw it into place. If you have a two-handle faucet, repeat this step for the second handle.
- Install the new shower head (optional): If you’re adding a new shower head, follow the manufacturer’s instructions for installation. Use plumber’s tape on any threading to create a water-tight seal.
- Test for leaks: Turn the water flow back on at the shut-off valve. Then, turn on the shower to ensure that neither the faucet handle nor the new shower head is leaking. If you find a leak, note its location. Disassemble the leaking area and check for gaps that let water through. If the showerhead is leaking near the connecting nut, remove the showerhead and apply a layer of plumber’s tape to the pipe threading.
How to Replace a Shower Faucet FAQs
Can you change a shower faucet without changing the valve?
Yes, you can change your shower faucet without changing out the valve. In fact, you likely don’t have to replace the valve unless you’re switching to an entirely different style of shower faucet. So, unless you need a two-handle system and you only have a one-handle system, you’re most likely fine with the valve you already have.
To replace a shower faucet without changing the valve, ensure that your new faucet system matches your old one. So, if you had a one-handle faucet, your new one also needs to be a one-handle model.
If, however, you want to switch to a different style of shower faucet, you need to replace the valve. Valve replacement should only be handled by a qualified professional, as it requires drywall removal, drilling, pipe cutting, and other complex plumbing tasks.
Need Help with Shower Faucet Replacement? Call Mr. Rooter Plumbing
Just because you know how to replace a shower faucet doesn’t mean you have to do it yourself or that you should. Shower faucet installations can go wrong, causing leaks in your walls that lead to mould growth and other problems.
If you want to change out your faucet type and don’t want to do any DIY plumbing, Mr. Rooter Plumbing is here to help. Our team’s bathtub remodeling services can help make your upgrade a breeze.
Contact us today to request a job estimate or schedule a service.