Summary:
- Signs of a Leaking Garburator: Common signs include damp cabinets, flooding under the sink, dripping sounds, and a rotten food smell from under the sink.
- Diagnosing the Leak Location: To identify the leak, fill the sink with water and check under the sink for leaks in areas like the dishwasher hose, water lines, garburator bottom, and drain.
- Fixing a Leak from the Top: If the leak is from the top, it may be due to a worn sink flange or putty. Detach the garburator, clean off old materials, and reseal with new flange or putty.
- Fixing Leaks from the Bottom or Side: Leaks from the bottom may be due to a broken internal seal, while leaks from the side could be from loose drain line connections or a faulty gasket. Tightening screws and replacing seals can sometimes fix these issues.
- Preventing Future Leaks: Prevent leaks by running cold water while using the garburator, following disposal guidelines, regularly inspecting the unit for cracks, and cleaning it regularly.
A garburator leaking water in your kitchen is something you’ll want to address quickly. It can be smelly and even lead to serious water damage if not repaired fast!
In this article, we’ll teach you how to fix a garburator, the signs you need to fix it, and how to diagnose the leak’s location. You can even learn how to stop your garburator leaking in the future!
How to Know Your Garburator is Leaking
Here are some of the most common signs indicating that your garburator has sprung a leak and requires repair or replacement:
- The cabinets under the sink are damp and soggy
- You’ve noticed flooding under the sink
- You hear a dripping sound in the sink when you run your garburator
- You’ve noticed a rotten or spoiled food smell coming from under the sink
How to Find Where Your Garburator Is Leaking From
Garburators can leak from many different areas and have different causes. For example, a garburator leaking from bottom regions can have an issue that differs from a garburator leaking from side parts. Whether your garburator is leaking from the bottom, side, or elsewhere, we can help you diagnose the leak location. Simply follow these steps:
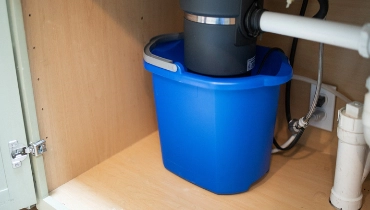
- Remove everything from the cabinet underneath your sink in the area where you’ll be working.
- Put a bucket or bowl underneath the sink to catch food scraps or water that may come out during the garburator repair.
- Unplug the garburator and insert a plug/stopper into the sink drain.
- Fill the sink with a few centimetres of water to help find the leak’s location.
- Check underneath the sink while the plug/stopper is in the sink. If the leak has stopped, take out the stopper.
- With the stopper out, look for a leak in the dishwasher hose, water lines from the wall, the bottom of the garburator, and the drain.
Common Causes of Garburator Leaks and How to Address Them
When you’ve confirmed the leak is in your garburator, take note of these tips for fixing the issue. Otherwise, call a trusted plumbing professional who can repair or replace your garburator for you.
Garburator Leaking from the Top
If your garburator is leaking from the top, you may have a worn sink flange or worn putty. This can mean that it’s no longer keeping the seal. You can fix the problem by taking these steps:
- Detach the garburator
- Remove the old flange or clean off the worn-out putty
- Reseal with a new flange or fresh plumber’s putty
Garburator Leaking from the Bottom
Garburators sometimes leak from the bottom when the seal inside the unit is broken. These internal seals can wear out over time. Unless your garburator is under warranty, the costs and time associated with performing repairs don’t always make them worthwhile. In that case, you may like to contact a plumbing professional to discuss garburator replacement.
Garburator Leaking from the Side
If your garburator is leaking from the side, it’s likely from where the drain lines are connected to the unit. You can try using a screwdriver to tighten the metal clamp connecting the lines from your garburator to your dishwasher. Sometimes, you can solve the leak by tightening the main drain line screws. Don’t forget to check the rubber gasket, as this can also fail and cause a leak.
How to Prevent Garburator Leaks in the Future
Most homeowners aren’t all that thrilled about performing any garburator repair tasks. A better plan is to avoid problems in the first place! Fortunately, regular garburator maintenance doesn’t require much time or effort. Take note of these tips to keep your garburator from leaking:
- Keep the cold water running when putting food down the garburator
- Follow the Do’s and Don’ts list for what you should and should not put down the disposal
- Stop once in a while to inspect the unit for cracks or small leaks
- Learn more about how to clean a garburator on the Mr. Rooter Plumbing® blog
Choose Mr. Rooter Plumbing® to Fix Your Garburator
Not every homeowner knows how to fix a garburator or even has the time! If your garburator is leaking water and you want to enjoy professional repairs, reach out to the team of plumbing experts at your locally owned and operated Mr. Rooter Plumbing®. Call us to schedule an appointment or request an estimate online.
If your leaking garburator caused severe damage, contact the water damage restoration professionals at Rainbow International. Like Mr. Rooter Plumbing®, Rainbow International is part of Neighbourly’s community of home service experts. You can count on them for water damage restoration and mould removal services.