A toilet serves one simple purpose. Most of us take our toilet for granted … until it stops doing its job. There’s nothing more frustrating than pressing down the handle to flush your toilet, only to find that it won’t flush. A malfunctioning toilet can cause unpleasant smells and endless anxiety.
If your toilet won’t flush, it’s usually because of one of the following reasons:
- The toilet is clogged
- The water level in the tank is too low
- The lift chain won’t work
- The rubber flapper in the toilet is not forming a tight seal
If your toilet won’t flush and you can’t repair it immediately, you’ll need to know how to flush it manually. The good news is that manually flushing a toilet is simple to do, and you can still flush your toilet even if the water supply is turned off.
3 Ways to Manually Flush a Toilet
When your toilet is malfunctioning, try these three manual flushing methods to keep your bathroom in business:
1. Throw a Bucket of Water into the Toilet Bowl
One of the simplest ways to manually flush your toilet is by pouring a bucket of water into the toilet bowl. You’ll just need a bucket containing a gallon or two of water. Older toilets may need 3-5 gallons of water to start the flushing cycle.
To manually flush your toilet:
- Fill a bucket with at least one gallon of water.
- Begin by pouring the water into the bowl, slowly at the beginning while gradually speeding up and dumping the remainder of the water into the bowl.
- If done correctly, the water should push the waste in the toilet through the pipes, and your toilet will flush.
2. Pour Water Into the Toilet Tank
A lot of toilet problems are caused by something going wrong inside the toilet tank. If your toilet isn’t flushing, then there may be a problem inside your water tank. To fix the issue, you can manually flush it by pouring water into your toilet tank.
To do this, you’ll need a bucket of water. To flush the toilet:
- Remove the toilet tank cover.
- Pour the water into the tank up to the water line, or one inch below the edge. The exact amount of water you’ll need for the flush will depend on the model of toilet you’ll have in your house.
- Try pressing the flush lever. If the toilet doesn’t flush, move on to the next step.
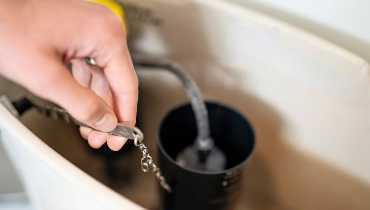
3. Pull the Rubber Flapper in the Toilet Tank
The rubber flapper in your toilet tank plays a vital role in your toilet flushing. If pressing your toilet’s handle doesn’t cause a flush, the flapper may need to be replaced. Before you replace the flapper, you can try pulling it up manually to flush the toilet.
To do this:
- Remove the toilet tank lid.
- If the chain is disconnected from the handle arm, grab the loose end of the chain and slide a link onto the hook at the end of the handle arm. Try pressing the flush handle again.
- If that didn’t resolve the issue, check to make sure the flapper is seated over the opening at the bottom of the tank. If it’s not, then re-seat it and you should notice water refilling the tank.
- If water doesn’t fill the tank, check to see if the chain has come loose from the flapper. If the chain has come loose, then reconnect it.
If your toilet doesn't manually flush after taking these steps, the flapper in your toilet tank may need to be replaced.
Mr. Rooter Plumbing Can Help With Flushing Issues
If your toilet will not flush, and manually flushing your toilet doesn’t do the trick, give your local Mr. Rooter® Plumbing a call. Mr. Rooter’s professional plumbers can help solve any plumbing problem you’re facing. Get started today by calling or request an estimate online.
Is it time for bathroom renovations? Check out these ideas for bathroom renovations for seniors from our friends at Mr. Handyman. As part of the Neighbourly® family of home services, Mr. Handyman is your source for a wide range of home improvement advice and expert service.