You’ve just finished your meal, and it’s time to wash the dishes. You turn on the sink faucet, and it immediately starts to fill up with water, so you go to run the garburator. Then it happens: Your garburator conks out on you.
Thankfully, this frustrating problem can be solved by a DIY plumber with a few common tools.
We’ll share some common causes of a garburator clog, show you how to eliminate the blockage, and answer a few frequently asked questions about garburators:
- Common Causes of Garburator Clogs
- Steps to Unclog a Garburator
- Unclogging a Garburator FAQs
Common Causes of Garburator Clogs
There are several potential causes of a clogged garburator. Before you try to fix yours, it’s essential to understand why the clog happened. Some common reasons for disposal clogs include:
- Not using enough water while running the disposal.
- Not grinding food long enough.
- Feeding the disposal too quickly.
- Grinding eggshells or coffee grinds, which stick to sludge in pipes and create clogs.
- Grinding potato or banana peels, which can form a starchy paste and clog the drain.
- Putting items that are unsafe into the garburator.
- Poor maintenance and sludge buildup.
*Get more help repairing and maintaining your kitchen appliances.
Steps to Unclog a Garburator
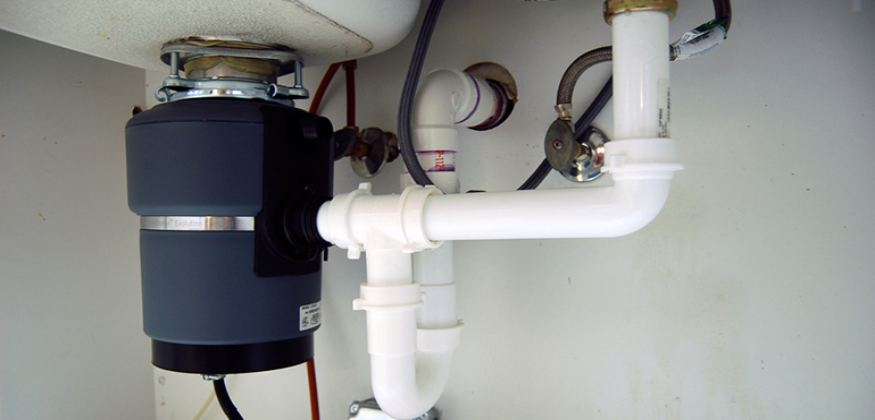
Most garburator clogs stem from an obstruction in the P-trap beneath your sink. The P-trap is a curved section of pipe that’s shaped like a “P” laid on its face. It holds water to prevent sewer gases from entering your home.
The shape of this pipe leads to the accumulation of debris and, eventually, clogs. Fortunately, clearing a P-trap clog is simple. All you have to do is remove and clean it. Here’s how to unclog a garburator:
- Know the ABCs of disposal safety. NEVER put your hands in the disposal. And NEVER use chemical drain cleaners to clear a clog, which can damage your disposal and splash back onto you, causing chemical burns.
- Find your trap. Look for the P- or S-shaped pipe beneath your disposal’s drain trap.
- Determine the P-trap style. If your P-trap doesn’t have a quick disconnect, you may need some channel-type pliers or channel locks. Like regular pliers, these include an extended adjustment section and angled jaw that allows them to grip pipes and plumbing parts of various sizes.
- Grab a bucket, towel, and tools. Lay the towel and bucket beneath the P-trap. It’s not uncommon for water to spill out of the sink pipes when they’re disconnected.
- Disconnect the trap. Place the bucket under the trap and use your channel locks to disconnect the slip-nut fitting on the drain.
- Remove the trap. Stay out of the splash zone, then check the pipe for clogs/obstructions, often found in the sharp bends of the trap. You may need a small scrub brush to dig out debris. If you don’t have a brush, a wire coat hanger may work.
- Check for clogs downstream. If you don’t find a clog in the trap, it may be in the part of the pipe that disappears into the wall, or even in the pipes inside the wall. Clearing these pipes will require a drain auger or assistance from a professional plumber.
- Reassemble the trap. Reassemble the trap and run the faucet for several minutes. This will clear any remaining debris and fill the P-trap.
Unclogging a Garburator FAQs
How do I unjam a garburator?
A jammed garburator is different from a clogged garburator. A clogged disposal might run, but a jammed one will not. In both cases, you need a fix quickly. To unjam a garburator, you’ve got two options: reset it or manually rotate the blades.
To reset the unit, unplug the garbage disposal. This is important for safety reasons. The outlet can usually be found under the sink. Next, press the reset button on the bottom of the disposal. After resetting the disposal, turn the faucet to cold and run the water for about one minute. Finally, plug the disposal back in and run it.
To rotate the blades, you need an Allen wrench. Unplug the garburator, then insert the Allen wrench into the hexagon-shaped hole on the underside of the unit. Crank the wrench back and forth to loosen the blades. Rotate fully clockwise, then counterclockwise; once the blades can complete a full rotation, they should be unjammed. Next, run the cold water for about one minute. Plug in the garburator and run it. If this doesn’t work, you should call a professional plumber.
Call Mr. Rooter for Help with Garburator Problems
If you can’t seem to fix your garburator using these methods, consider Mr. Rooter Plumbing's fast, professional plumbing services. Learn more about our affordable, upfront, flat-rate pricing and courteous service today.
Looking for more tips? Learn how to properly clean your garburator with these garbage disposal cleaning tricks.